JavaScriptを使って、HTML5のCanvasでの図形の描画

こんにちはあっくんです。最近、気温が少しずつ上昇してますが、みなさん、体調は大丈夫でしょうか?僕は体調不良中ですが、少しずつ体調が良くなってきてます。ステロイドが入っているセレスタミンという薬を飲んで、肌荒れ、かゆみの症状が軽くなってます。ただ、セレスタミンの服用をやめた時の副作用で、更に肌が荒れたり体調が悪くなるとかの記事をみたり、身近な人に聞いてビビってます。
今回はJavaScriptを使って、HTML5のCanvasでの図形の描画をやって行きましょう。x,y座標を使って点を結んで線を引いたりするので、中学生の時に学んだ関数を思い出します。
JavaScriptを使って、HTML5のCanvasでの図形の描画は塗りつぶし描画と、線描画があります。
塗りつぶしの設定と線描画の設定があります。
点の集合をもとにパスという領域を作り、塗りつぶすか、線を引く。
塗りつぶし設定
.fillStyle
#ffbbccや rgba(0,0,255,0.5)などの、CSSと同じ記法の塗りつぶしスタイルを設定。
線描画の設定
.strokeStyle
#ffbbccやrgba(0,0,255,0.5)などの、CSSと同じ記法の線描画スタイルを設定。
.lineWidth
線の幅をピクセル数で指定。
.lineCap
線の終端の形状を、butt(終端に垂直)、round(終端を中心に丸く)、square(終端を中心に四角)のいずれかで設定。
.lineJoin
線の曲がる場所の形状を、bevel(角を落とす)、round(丸く)、miter(そのまま延長して尖らせる)のいずれで設定。
塗りつぶし/線描画の共通設定
.globalAlpha
描画時の透明度を0.0(透明)~1.0(不透明)で設定。
描画の保存/復帰のメソッド
.save()
状態を保存。
.restore()
状態を復帰。
矩形(くけい)の描画
よく使う矩形(長方形)はパスを作らずに直接描画するメソッドが用意されています。
Canvasの描画の基本は、パスを作って塗りつぶす、あるいは線描画をします。
矩形の描画に関わるメソッド
.fillRect(x, y, w, h)
座標x, y, 横幅w, 高さhで矩形を塗りつぶします。
.strokeRect(x, y, w, h)
座標x, y, 横幅w, 高さhで矩形の線を描きます。
.clearRect(x, y, w, h)
座標x, y, 横幅w, 高さ。
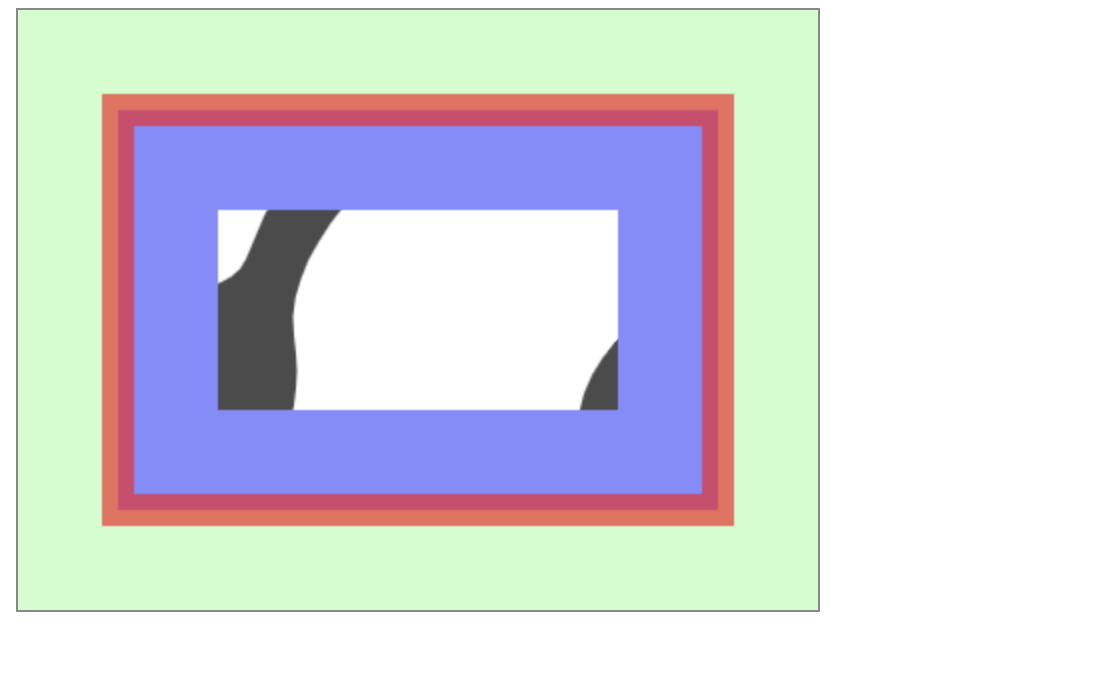
例、矩形描画。
<!DOCTYPE html>
<html lang="en">
<head>
<meta charset="UTF-8" />
<style>
canvas {
background: url(./img/スプーンアイコン.png);
border: solid 1px #888;
}
</style>
</head>
<body>
<canvas id="canvas" width="400" height="300"></canvas>
<script>
// Canvasを選択して、 2 次元コンテクストを取り出す
const canvas = document.querySelector("#canvas");
const context = canvas.getContext("2d");
// 背景を作る 塗りつぶし色を指定して、全領域の矩形を書く
context.fillStyle = "#ccffcc";
context.fillRect(0, 0, canvas.width, canvas.height);
// 塗りつぶし色と、線の色と太さを指定
context.fillStyle = "#8888ff";
context.strokeStyle = "rgba(255, 32, 32, 0.66";
context.lineWidth = 16;
// 矩形を描く
context.fillRect(50, 50, 300, 200); //塗りつぶし
context.strokeRect(50, 50, 300, 200); //線描画
context.clearRect(100, 100, 200, 100); //消去
</script>
</body>
</html>Code language: HTML, XML (xml)パスの描画
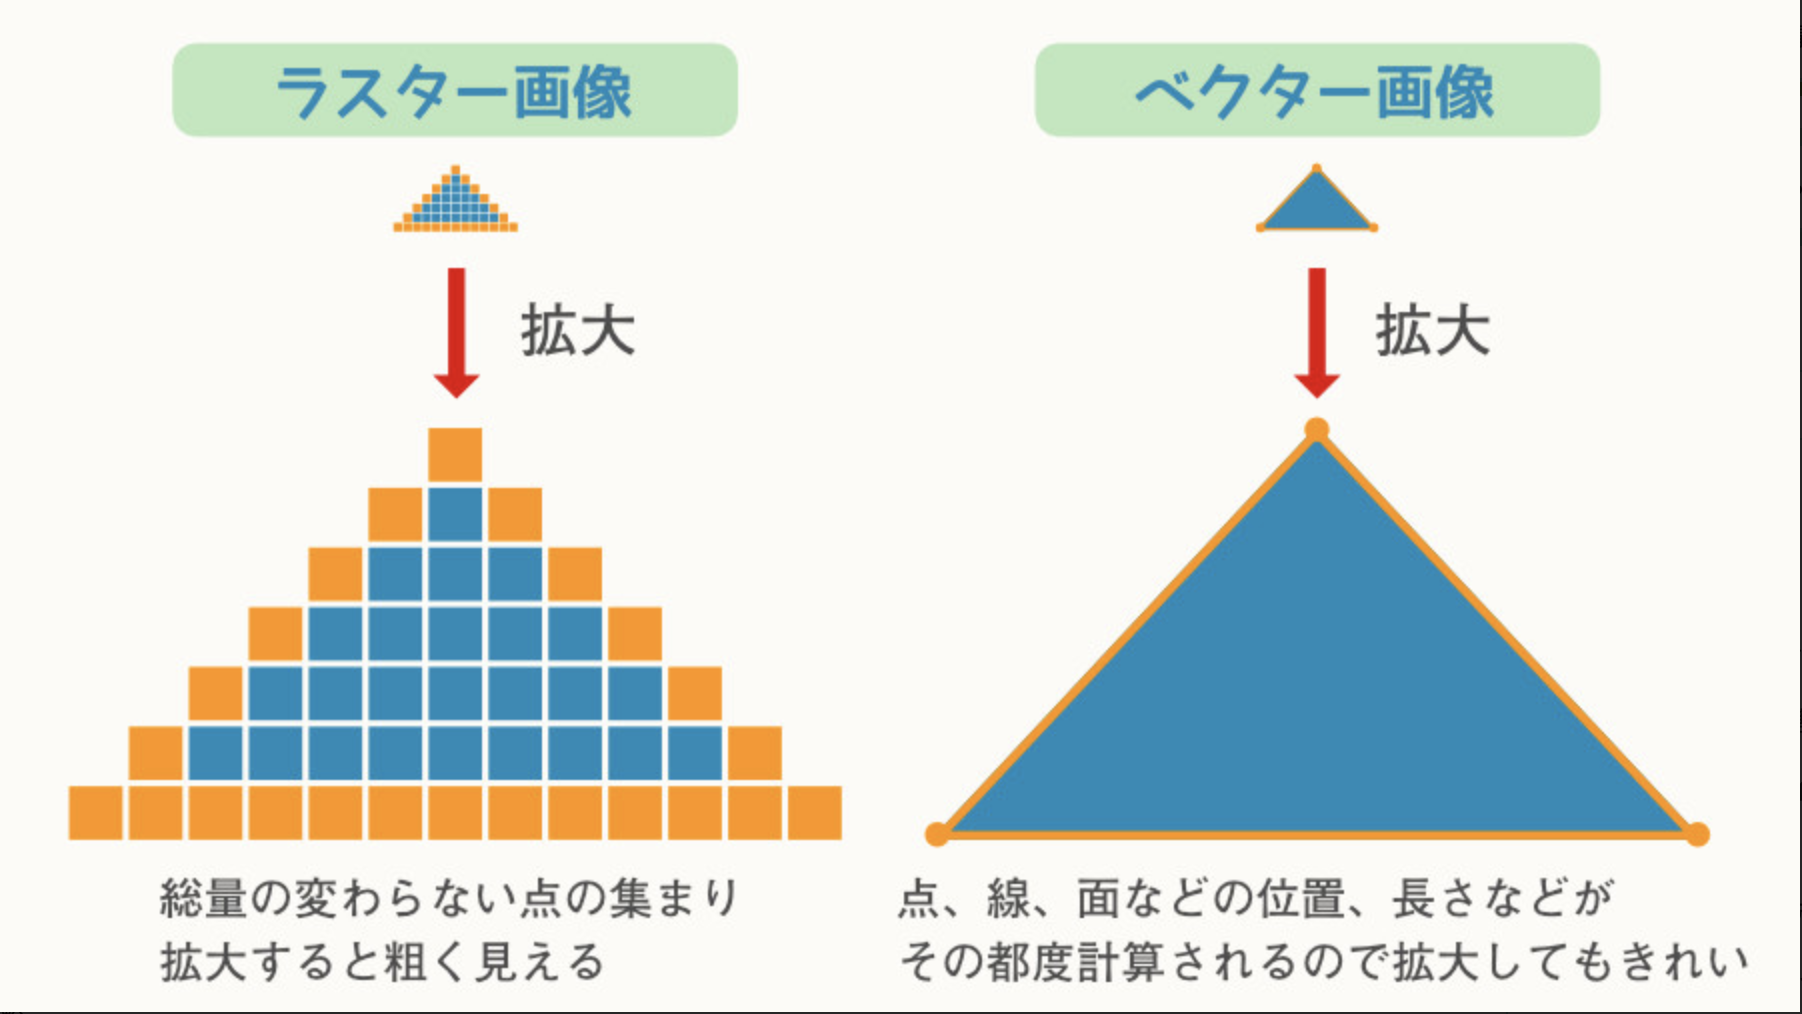
画像の描画の方式には、ラスター形式 とベクター形式があります。
ラスター形式は、1ドットずつにRGB(赤緑青)の色を指定していきます。ピクセル(画素)という点の集まりで、画像を表現します。
ベクター方式は、点をいくつか集めて、その間の線をひきます。色や形などの情報をパソコンが数値化して表現します。
パスの描画はベクター方式です。
パスを作るメソッド
.beginPath()
現在のパスをリセットして、パスの指定を開始。
.moveTo(x, y)
座標x, y 始点を移動。サブパスの作成を開始。
.lineTo(x, y)
座標x, y にパスの座標を追加。
.closePath()
始点と最終座標を結んでパスを閉じます。
パス作成後に塗りつぶしや線描画をするメソッド
.fill()
パスの内側を塗りつぶします。
.stroke()
パスに沿って線描画。
.clip()
画像を描画可能な、クリップ領域を作ります。
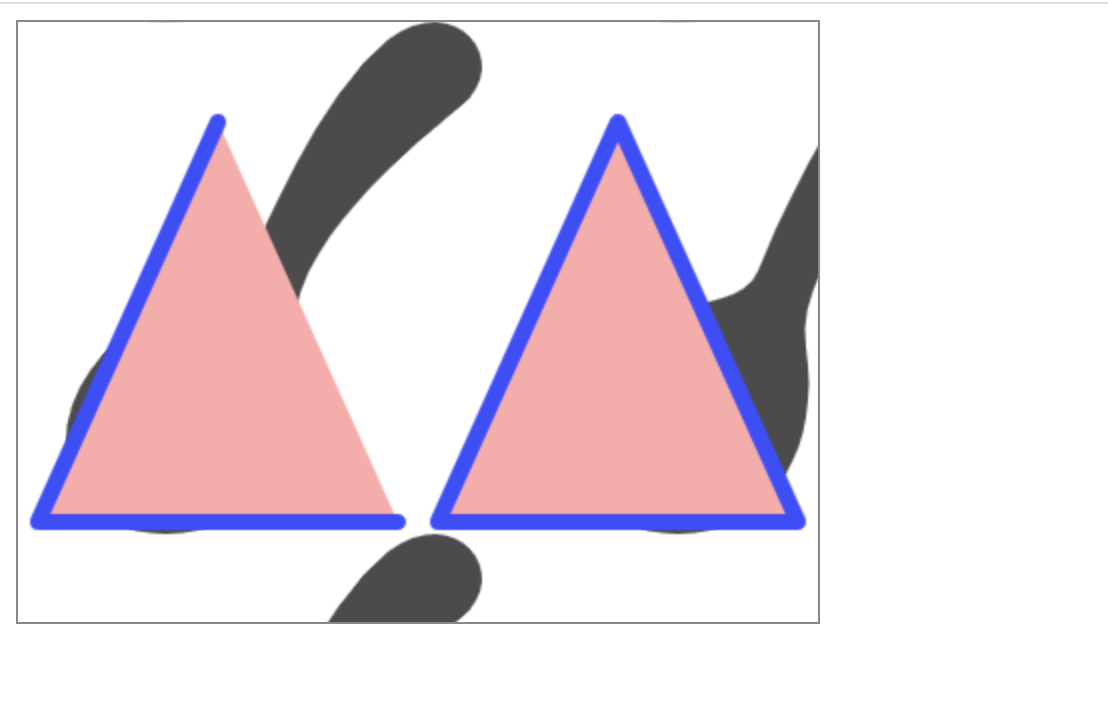
例、.fill(), .stroke()を使って、パスを閉じない三角形とパスを閉じた三角形を描きます。
<!DOCTYPE html>
<html lang="en">

<head>
    <meta charset="UTF-8" />
    <style>
        canvas {
            /* 背景画はスプーンアイコン */
            background: url(./img/スプーンアイコン.png);
            border: solid 1px #888;
        }
    </style>
</head>

<body>
    <canvas id="canvas" width="400" height="300"></canvas>

    <script>
        // Canvasを選択して、2次元コンテクストを取り出す
        const canvas = document.querySelector("#canvas");
        const context = canvas.getContext("2d");

        // 設定を行う
        context.fillStyle = "#faa";
        context.strokeStyle = "#44f";
        context.lineWidth = 8;
        context.lineCap = "round";
        context.lineJoin = "round";

        // // パスの指定を開始
        context.beginPath();

        // // 左上に三角
        context.moveTo(100, 50);
        context.lineTo(10, 250);
        context.lineTo(190, 250);

        // // 右上に三角
        context.moveTo(300, 50);
        context.lineTo(210, 250);
        context.lineTo(390, 250);
        context.closePath();

        context.fill(); //塗りつぶし
        context.stroke(); //線描画
    </script>
</body>

</html>Code language: HTML, XML (xml)
例、.clip()でクリップ領域の中を描画します。事前に描画を.save()で保存しておけば、.clip()で作成したあと、restore()で復帰して、クリップ領域を消せます。
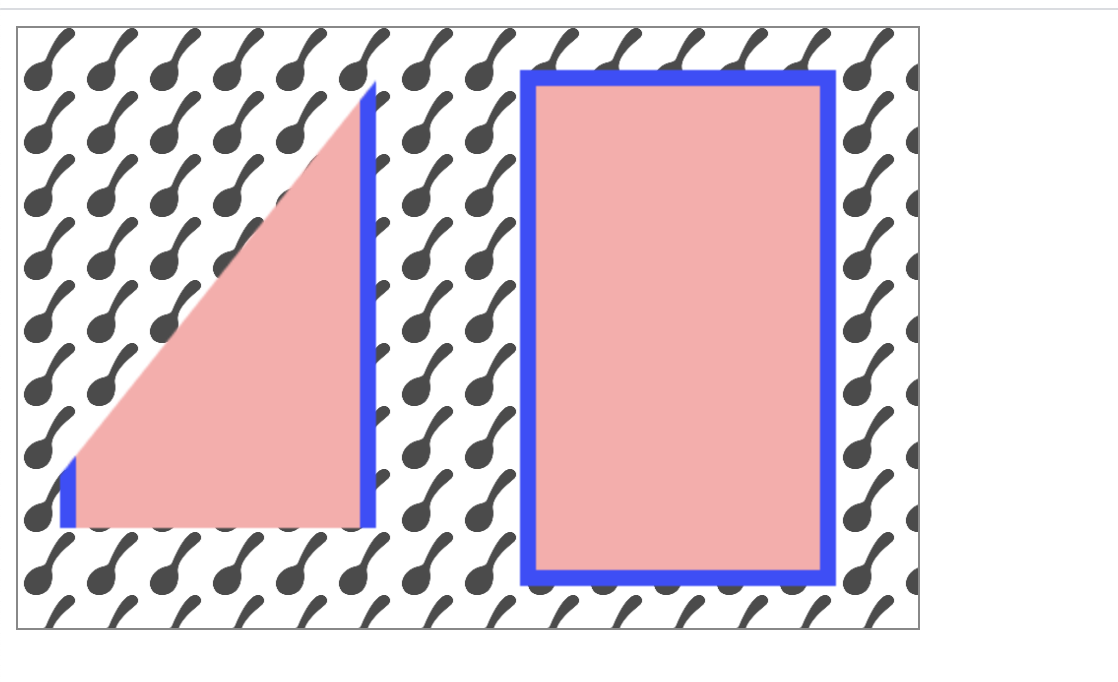
<!DOCTYPE html>
<html lang="en">

<head>
    <meta charset="UTF-8" />
    <style>
        canvas {
            /* 背景をスプーンのアイコンにしています */
            background: url(./img/スプーンアイコン.png);
            background-size: 7%;
            border: solid 1px #888;
        }
    </style>
</head>

<body>
    <canvas id="canvas" width="450" height="300"></canvas>

    <script>
        // Canvasを選択して、2次元コンテクストを取り出す
        const canvas = document.querySelector("#canvas");
        const context = canvas.getContext("2d");

        // 設定を行う
        context.fillStyle = "#faa";
        context.strokeStyle = "#44f";
        context.lineWidth = 8;

        // パスの指定を開始
        context.beginPath();

        // パスを作る(三角形)
        context.moveTo(200, 0);
        context.lineTo(0, 250);
        context.lineTo(400, 250);
        context.closePath();

        // コンテクストを保存してクリップ
        context.save();
        context.clip();

        // // 矩形を描く
        context.fillRect(25, 25, 150, 250);
        context.strokeRect(25, 25, 150, 250);

        // // コンテクストを復帰
        context.restore();

        // // 矩形を描く
        context.fillRect(255, 25, 150, 250);
        context.strokeRect(255, 25, 150, 250);
    </script>
</body>

</html>Code language: HTML, XML (xml)
円弧の描画
円弧のパスを作成するメソッド
.arc(x, y, r, s, e[, a])
座標x,y を中心に、半径r、開始角度s、終了角度e、の円弧を作ります。パスは時計回りに作られ、aにtrueを設定すると反時計周りになります。aは省略可能。
角度の単位はラジアンです。ラジアンとは、
円(扇形)の孤の長さ(L)、円の半径(r)とすると、
「L/r」
によって求められる値のことです。
ラジアンの単位は、[rad(ラジアン)]です。
180°=π[rad]です。
角度(ここではθ°とします)をラジアンに変換するには、
「θ = θ°×π/180」です。
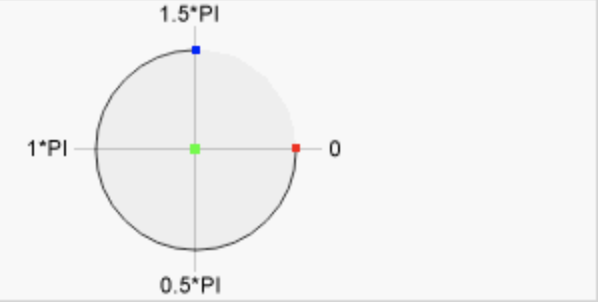
角度は右端からはじまり、2πで1周します。Math.Plがπを表します。1周の角度は2Math.Plです。360度表記であらわすときは、360 / 180Math.Plと書きます。
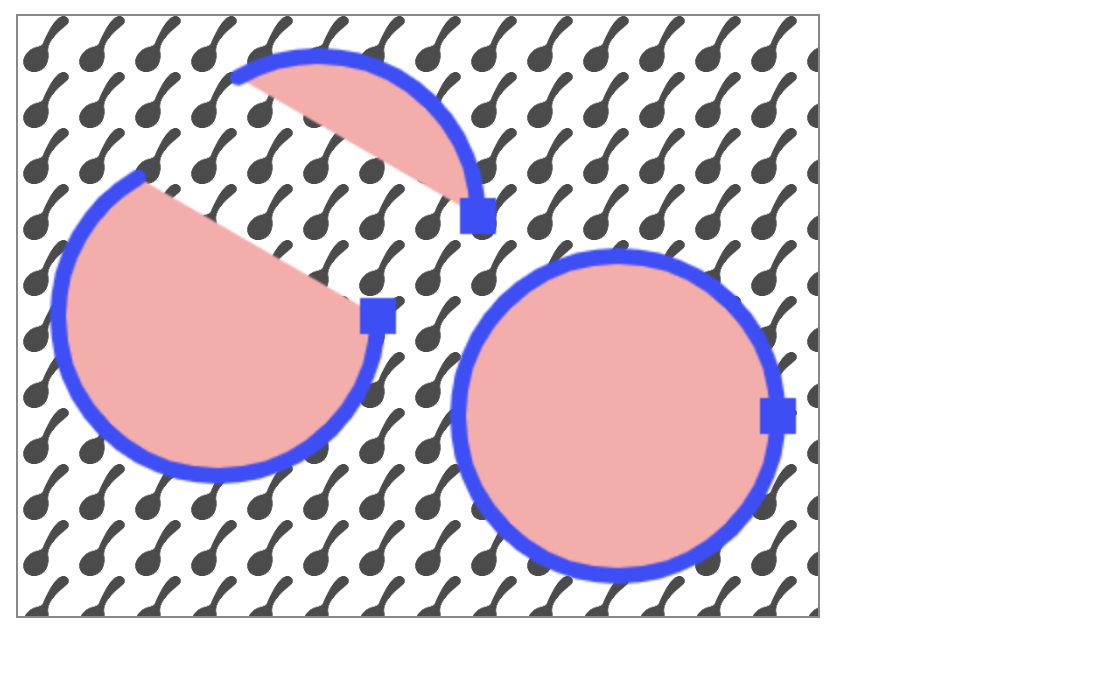
例、左の円弧、上の円弧、右下の円弧。0度に矩形を書いて基準の場所がわかるようにしています。
<!DOCTYPE html>
<html lang="en">

<head>
    <meta charset="UTF-8" />
    <style>
        canvas {
            /* 背景をスプーンのアイコンにしています。 */
            background: url(./img/スプーンアイコン.png);
            background-size: 7%;
            border: solid 1px #888;
        }
    </style>
</head>

<body>
    <canvas id="canvas" width="400" height="300"></canvas>

    <script>
        // Canvasを選択して、2次元コンテクストを取り出す
        const canvas = document.querySelector("#canvas");
        const context = canvas.getContext("2d");

        // 設定を行なう
        context.fillStyle = "#faa";
        context.strokeStyle = "#44f";
        context.lineWidth = 8;
        context.lineCap = "round";

        // ---------左の円弧
        // パスを作る時計回り
        context.beginPath();
        context.arc(100, 150, 80, 0, (240 / 180) * Math.PI);
        context.fill();
        context.stroke();

        // 回転の始点の描画
        context.strokeRect(175, 145, 10, 10); //塗りつぶし

        // ---------上の円弧
        // パスを作る 反時計回り
        context.beginPath();
        context.arc(150, 100, 80, 0, (240 / 180) * Math.PI, true);
        context.fill(); //塗りつぶしt
        context.stroke(); //線描画

        // 回転の始点を描画
        context.strokeRect(225, 95, 10, 10); //塗りつぶし

        // ----------右の円弧
        // パスを作る ぐるっと1周
        context.beginPath();
        context.arc(300, 200, 80, 0, (360 / 180) * Math.PI);
        context.fill(); //塗りつぶし
        context.stroke(); //線描画

        // 回転の始点の描画
        context.strokeRect(375, 195, 10, 10); //塗りつぶし
    </script>
</body>

</html>Code language: HTML, XML (xml)
円弧のパスを作成するメソッド
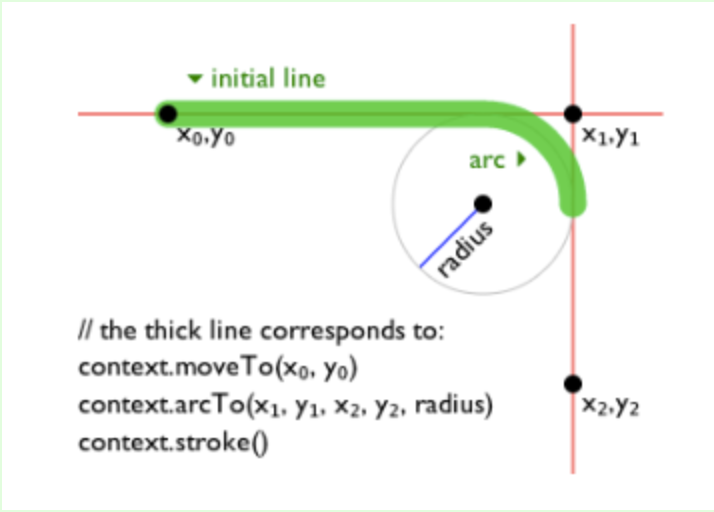
.arcTo(x1, y1, x2, y2, r)
直前の座標x0, y0から、座標x1, y1にパスを伸ばしていきます。そして、半径rの円弧を描くように、座標x2, y2にいたるパスをひきます。
例、.arcTo()。 半径の四角と3つの座標をも描画します。
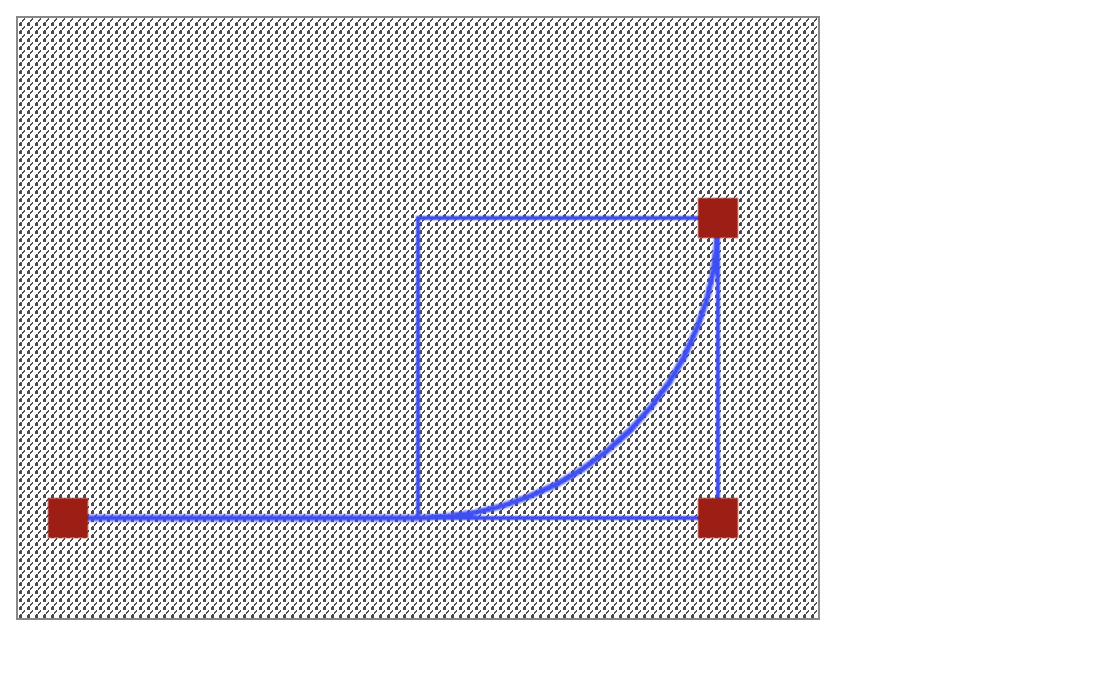
<!DOCTYPE html>
<html lang="en">

<head>
    <meta charset="UTF-8" />
    <style>
        canvas {
            /* 背景にスプーンのアイコンを使っています */
            background: url(./img/スプーンアイコン.png);
            background-size: 1%;
            border: solid 1px #888;
        }
    </style>
</head>

<body>
    <canvas id="canvas" width="400" height="300"></canvas>

    <script>
        // Canvasを選択して2次元コンテクストを取り出す
        const canvas = document.querySelector("#canvas");
        const context = canvas.getContext("2d");

        // 座標
        const x0 = 25,
            y0 = 250;
        const x1 = 350,
            y1 = 250;
        const x2 = 350,
            y2 = 100;

        // --------
        // 設定を行う
        context.fillStyle = "#a00";
        context.strokeStyle = "#44f";
        context.lineWidth = 3;

        // パスを作る
        context.beginPath();
        context.moveTo(x0, y0);
        context.arcTo(x1, y1, x2, y2, 150);
        context.stroke(); //線描画

        // --------
        // 設定を行う
        context.lineWidth = 2;

        // 半径を描く
        context.strokeRect(200, 250, 150, -150);

        // 3つの座標
        context.fillRect(x0 - 10, y0 - 10, 20, 20);
        context.fillRect(x1 - 10, y1 - 10, 20, 20);
        context.fillRect(x1 - 10, y2 - 10, 20, 20);
    </script>
</body>

</html>Code language: HTML, XML (xml)
ベジェ曲線
ベジェ曲線は制御点(Control point)によって描く曲線です。制御点が1つの2次ベジェ曲線と制御点が2つの3次ベジェ曲線があります。
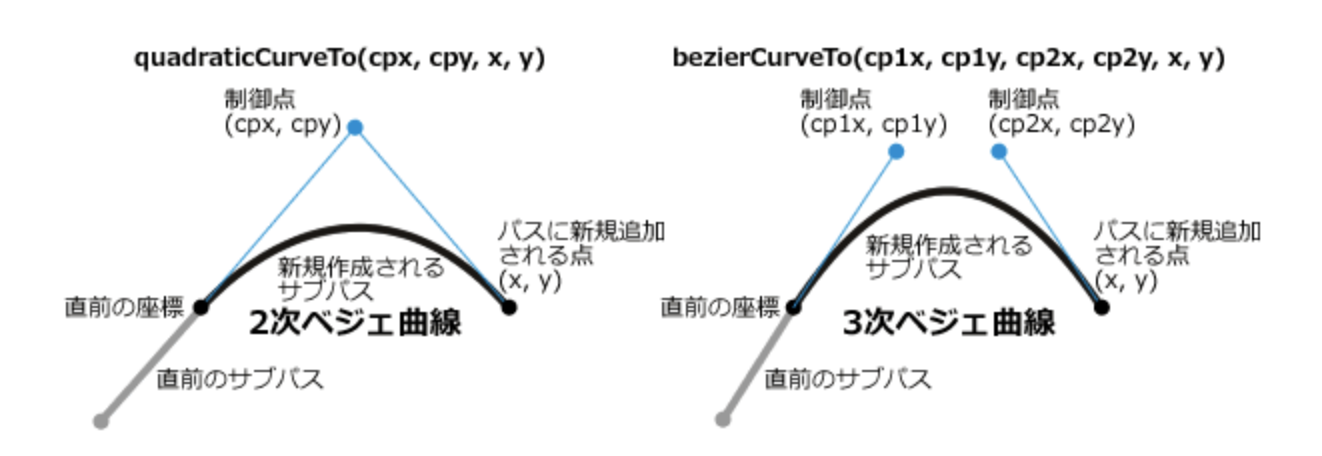
ベジェ曲線の描画するメソッド
.quadraticCurveTo(cx, cy, x, y)
制御点cx, cy、次の制御点x, yの、2次ベジェ曲線のパスを作ります。
.bezierCurveTo(cx1, cy1, cx2, cy2, x, y)
制御点cx1, cy1、制御点cx2, cy2、次の座標がx, yの、3次ベジェ曲線のパスをつくります。
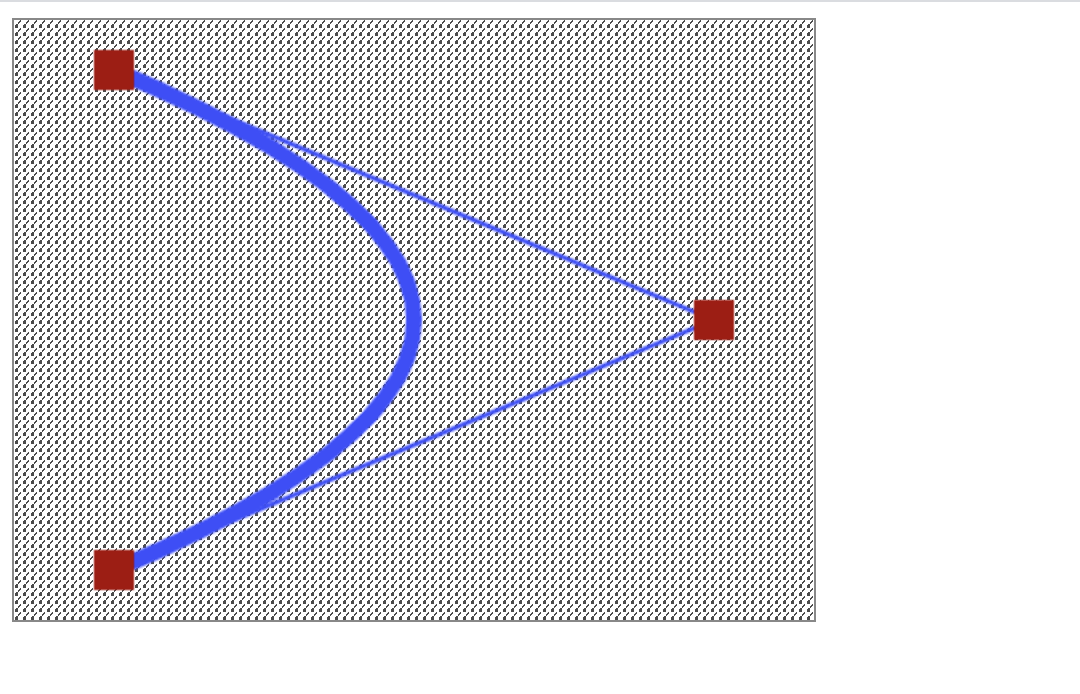
例、2次ベジェ曲線です。
<!DOCTYPE html>
<html lang="en">
<head>
<meta charset="UTF-8" />
<style>
canvas {
background: url(./img/スプーンアイコン.png);
background-size: 1%;
border: solid 1px #888;
}
</style>
</head>
<body>
<canvas id="canvas" width="400" height="300"></canvas>
<script>
// Canvasを洗濯して、2次元コンテクストを取り出す
const canvas = document.querySelector("#canvas");
const context = canvas.getContext("2d");
// 座標
const x0 = 50,
y0 = 25;
const cx = 350,
cy = 150;
const x = 50,
y = 275;
// --------
// 設定を行う
context.fillStyle = "#a00";
context.strokeStyle = "#44f";
context.lineWidth = 8;
// パスを作る
context.beginPath();
context.moveTo(x0, y0);
context.quadraticCurveTo(cx, cy, x, y);
context.stroke(); //線描画
// --------
// 設定を行う
context.lineWidth = 2;
// パスを作る
context.beginPath();
context.moveTo(x0, y0);
context.lineTo(cx, cy);
context.lineTo(x, y);
context.stroke(); //線描画
// 3つの座標
context.fillRect(x0 - 10, y0 - 10, 20, 20);
context.fillRect(cx - 10, cy - 10, 20, 20);
context.fillRect(x - 10, y - 10, 20, 20);
</script>
</body>
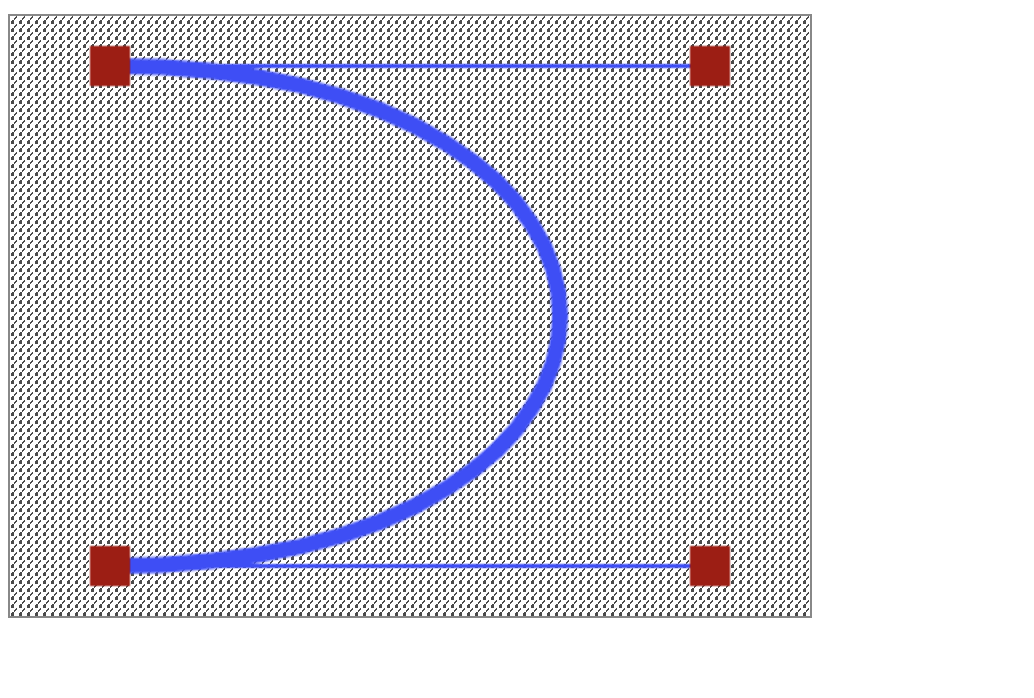
</html>Code language: HTML, XML (xml)例、3次ベジェ曲線です。
<!DOCTYPE html>
<html lang="en">

<head>
    <meta charset="UTF-8" />
    <meta http-equiv="X-UA-Compatible" content="IE=ed" />
    <style>
        canvas {
            /* 背景にスプーンのアイコンを使ってます */
            background: url(./img/スプーンアイコン.png);
            background-size: 1%;
            border: solid 1px #888;
        }
    </style>
</head>

<body>
    <canvas id="canvas" width="400" height="300"></canvas>

    <script>
        // Canvasを洗濯して、2次元コンテクストを取り出す
        const canvas = document.querySelector("#canvas");
        const context = canvas.getContext("2d");

        // 座標
        const x0 = 50,
            y0 = 25;
        const cx1 = 350,
            cy1 = 25;
        const cx2 = 350,
            cy2 = 275;
        const x = 50,
            y = 275;

        // ----------
        // 設定を行う
        context.fillStyle = "#a00";
        context.strokeStyle = "#44f";
        context.lineWidth = 8;

        // パスを作る
        context.beginPath();
        context.moveTo(x0, y0);
        context.bezierCurveTo(cx1, cy1, cx2, cy2, x, y);
        context.stroke();

        // --------
        // 設定をおこなう
        context.lineWidth = 2;

        // パスを作る
        context.beginPath();
        context.moveTo(x0, y0);
        context.lineTo(cx1, cy1);
        context.moveTo(x, y);
        context.lineTo(cx2, cy2);
        context.stroke(); //線描画

        // 3つの座標
        context.fillRect(x0 - 10, y0 - 10, 20, 20);
        context.fillRect(cx1 - 10, cy1 - 10, 20, 20);
        context.fillRect(cx2 - 10, cy2 - 10, 20, 20);
        context.fillRect(x - 10, y - 10, 20, 20);
    </script>
</body>

</html>Code language: HTML, XML (xml)
読んでいただいて、ありがとうございました。JavaScript完全入門、おすすめです。